Henna and Bleach Trials (Stylists Edition)

Many people ask if they should bleach their hair before they henna. I decided to set up henna and bleach trials to see what differences I might get for different situations.

As we all know, lightening your hair is not always the ideal option, as this is a chemical hair process, but it can help achieve lighter colors that you may not be able to get by only hennaing. You can find more information in chapter 10 lightening your hennaed hair in our e-book.

Hair and Mix Prep

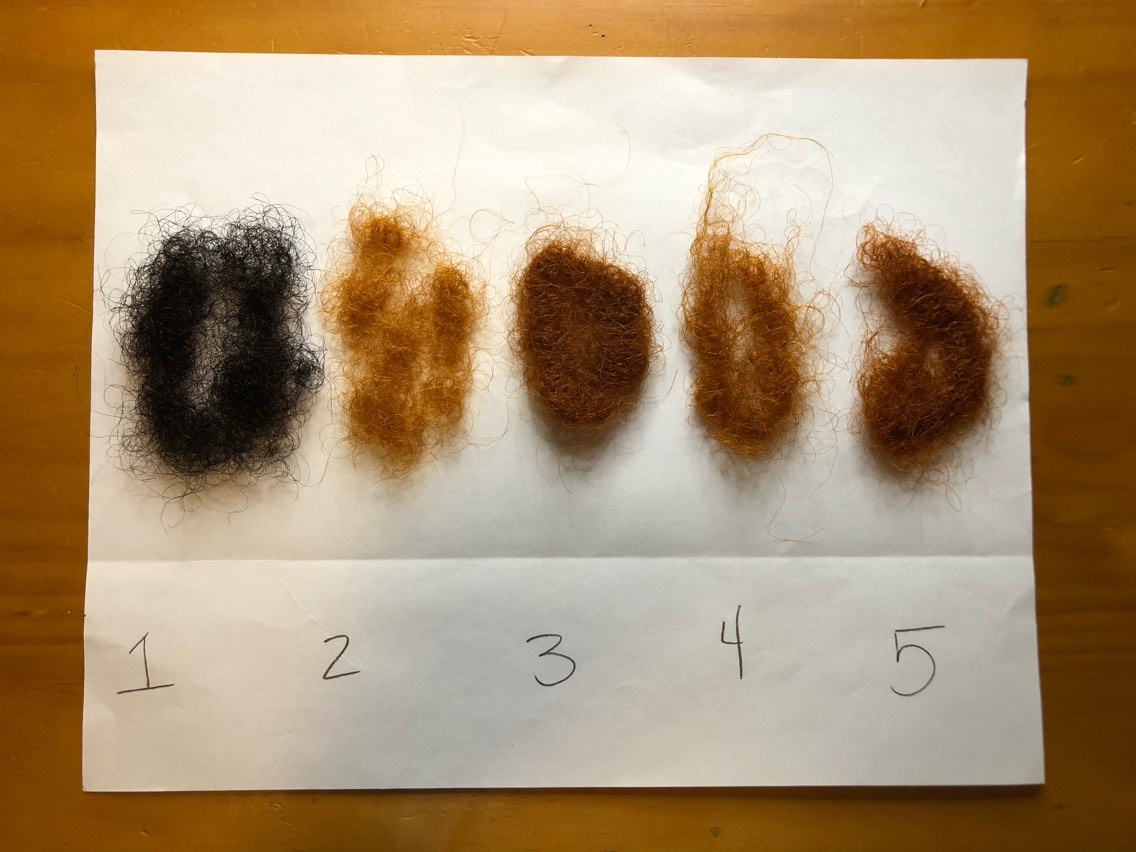
My test began with harvested hair from my brush.  My natural hair color is black with no gray. When I use henna, my hair has a red shine in the sun with great conditioning benefits.

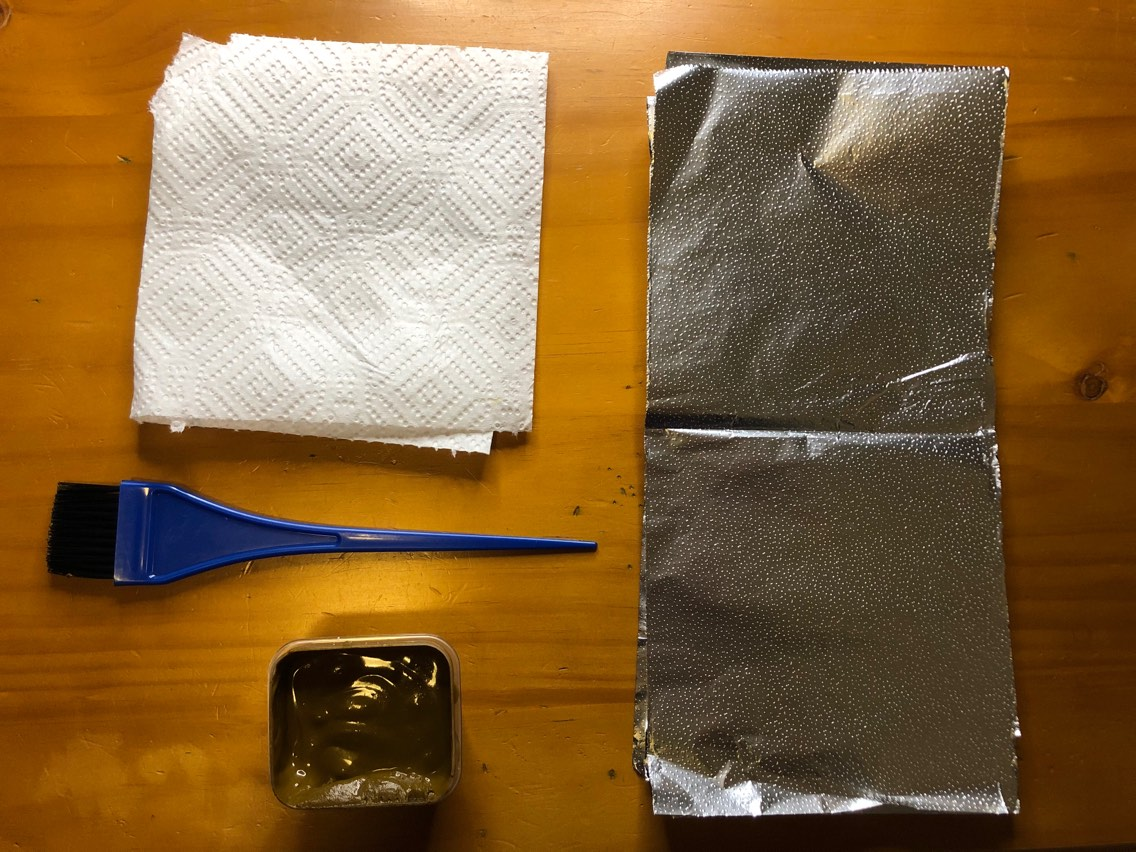
Each of the hair samples have different variables, however, they all were washed with Dawn dish soap before each henna application. I mixed Rarity henna with lemon juice and dye released at room temperature for 9 hours.  All the samples had the same processing time of 4 hours, as well as controlled lightening times. I used equal parts 20 volume developer with lightening powder.

Trials

Test 1: This particular sample hair was hennaed two times, then bleached for 30 minutes. I redid this test because I left the bleach on the first sample longer than intended. The bleach was meant to sit for 30 minutes and I left it on for an hour.

Test 2: The hair sample in this test was hennaed, bleached for 30 minutes, and hennaed again.

Test 3: This sample was colored, bleached for 30 minutes twice, hennaed, and hennaed again.

Test 4: Hair sample number 4 was bleached to damage by bleaching three times at 30 minutes, hennaed, then hennaed again.

Test 5: This hair sample was bleached for 30 minutes, hennaed, and hennaed again.

These tests mimic what we see often in customer service and potential clients. We understand that everyone who is new to henna likely has hair that has been chemically treated previously.

Henna and Bleach Trials in Photos

1 hour before application
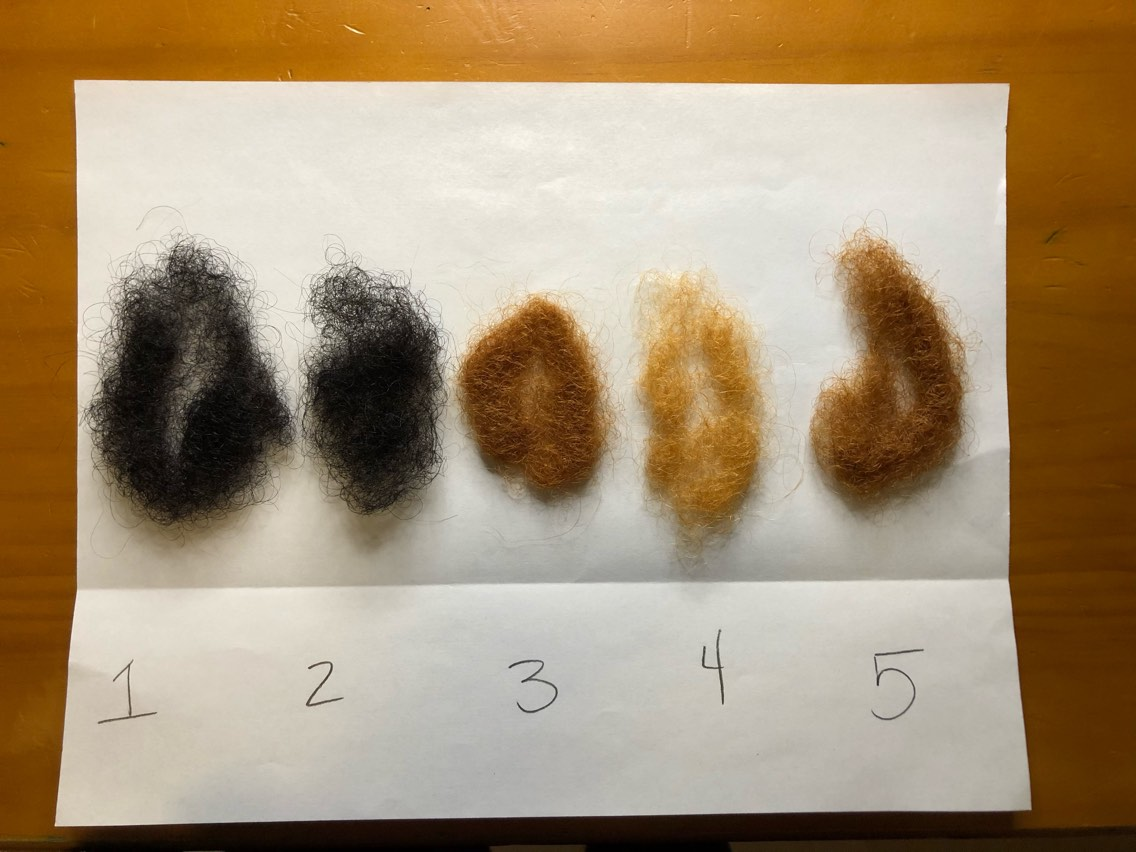
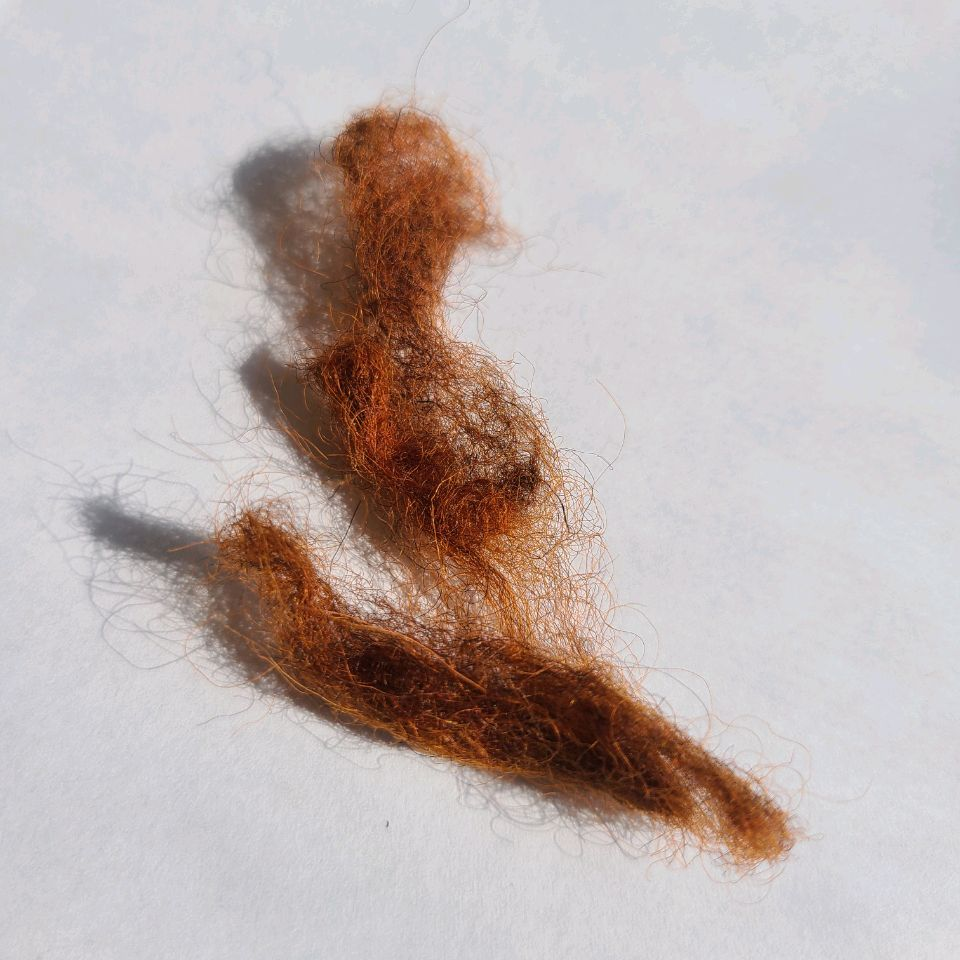
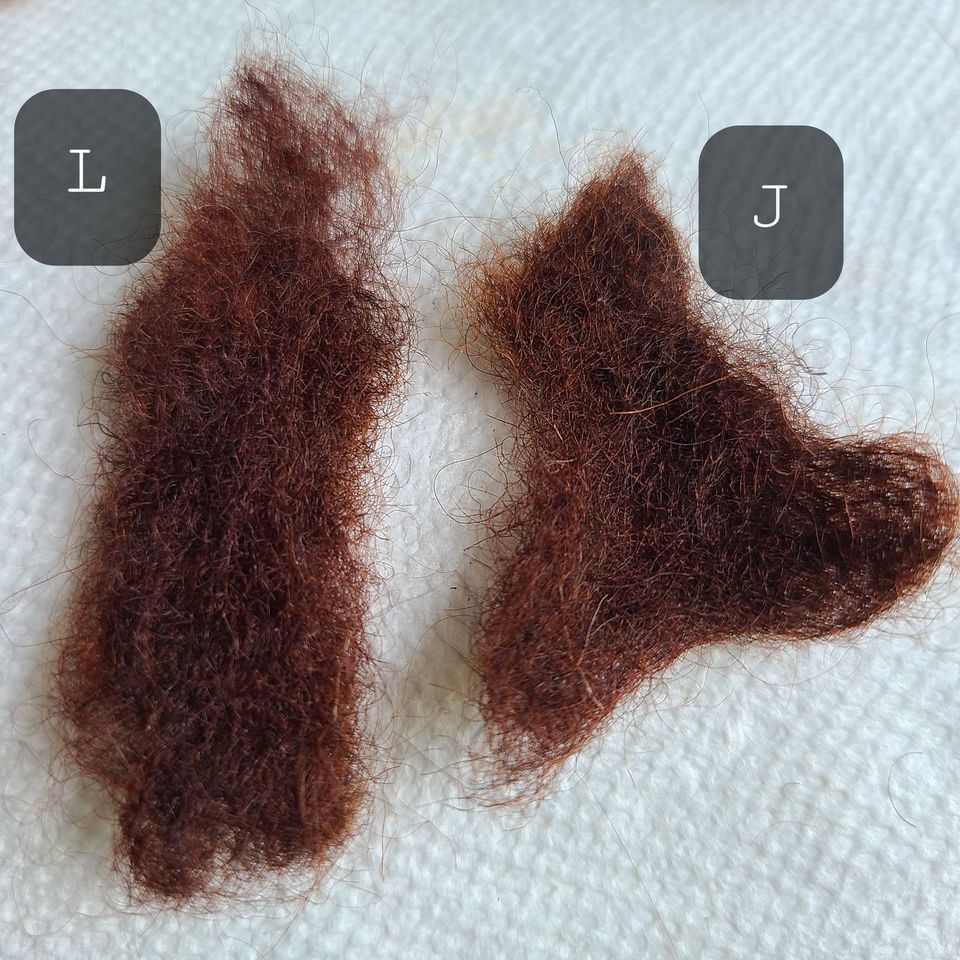
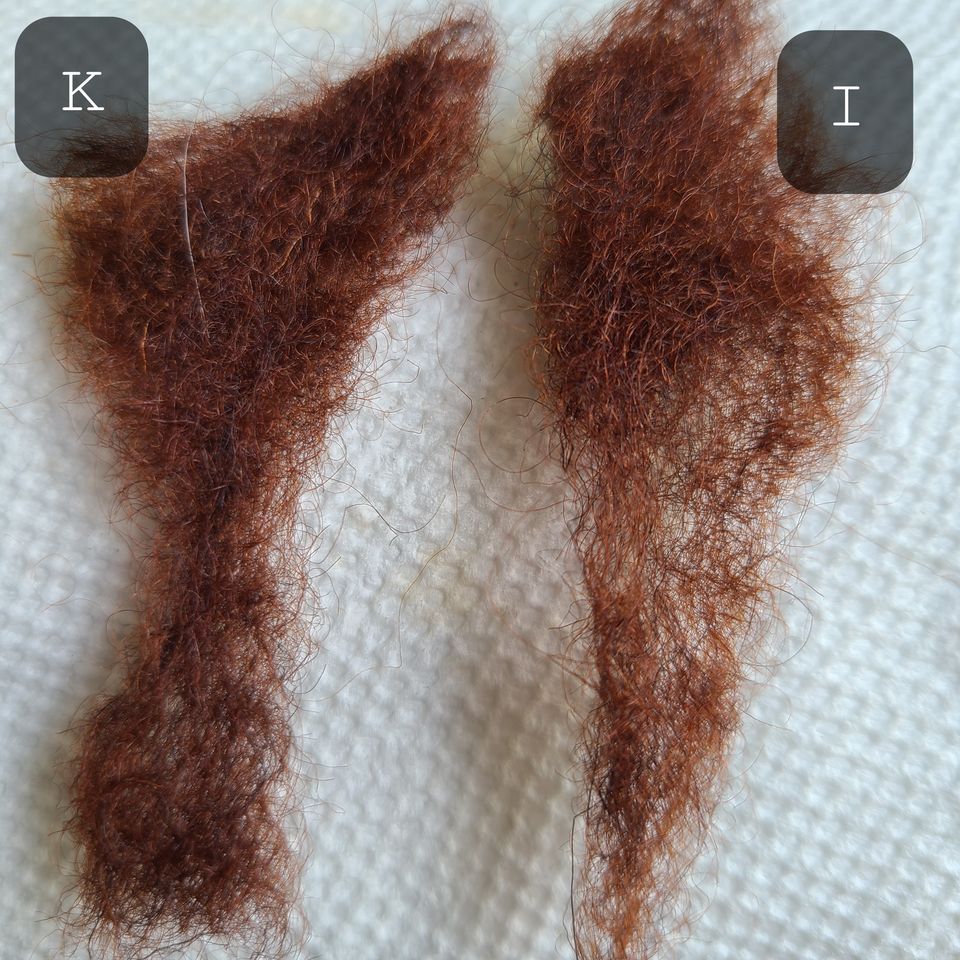
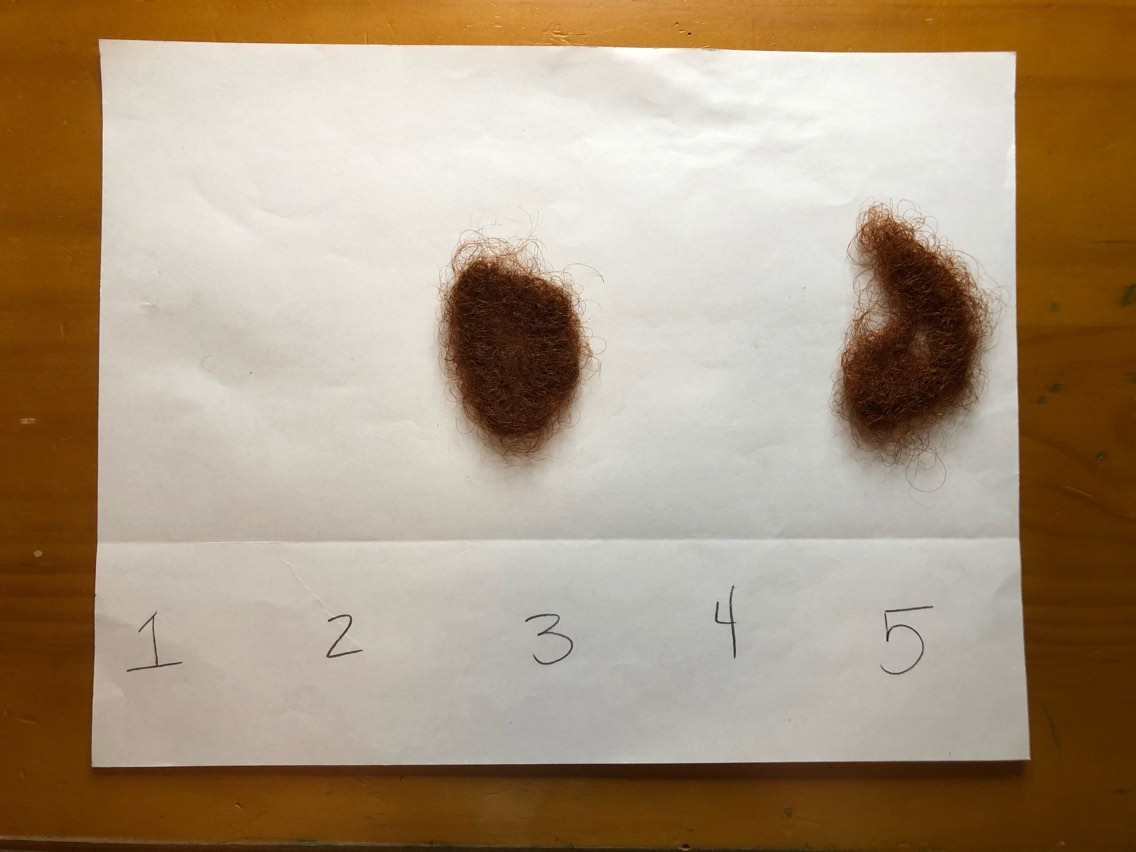
I prepared my hair for the first henna application. Here we have the hair at different levels of lightening to see how the results may vary. Number 3 and 5 are very similar in color.

8 hour after application
Number 3 and 5 continue to be very similar.

1 week oxidized
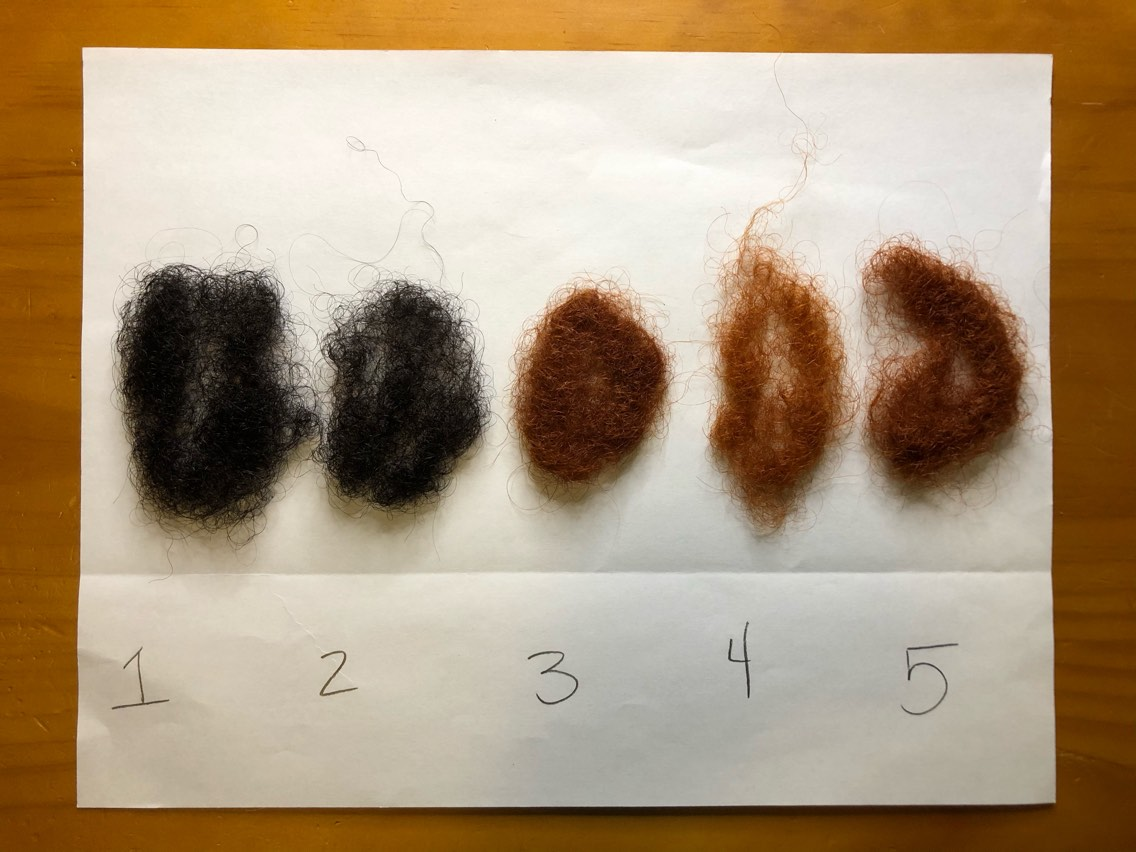
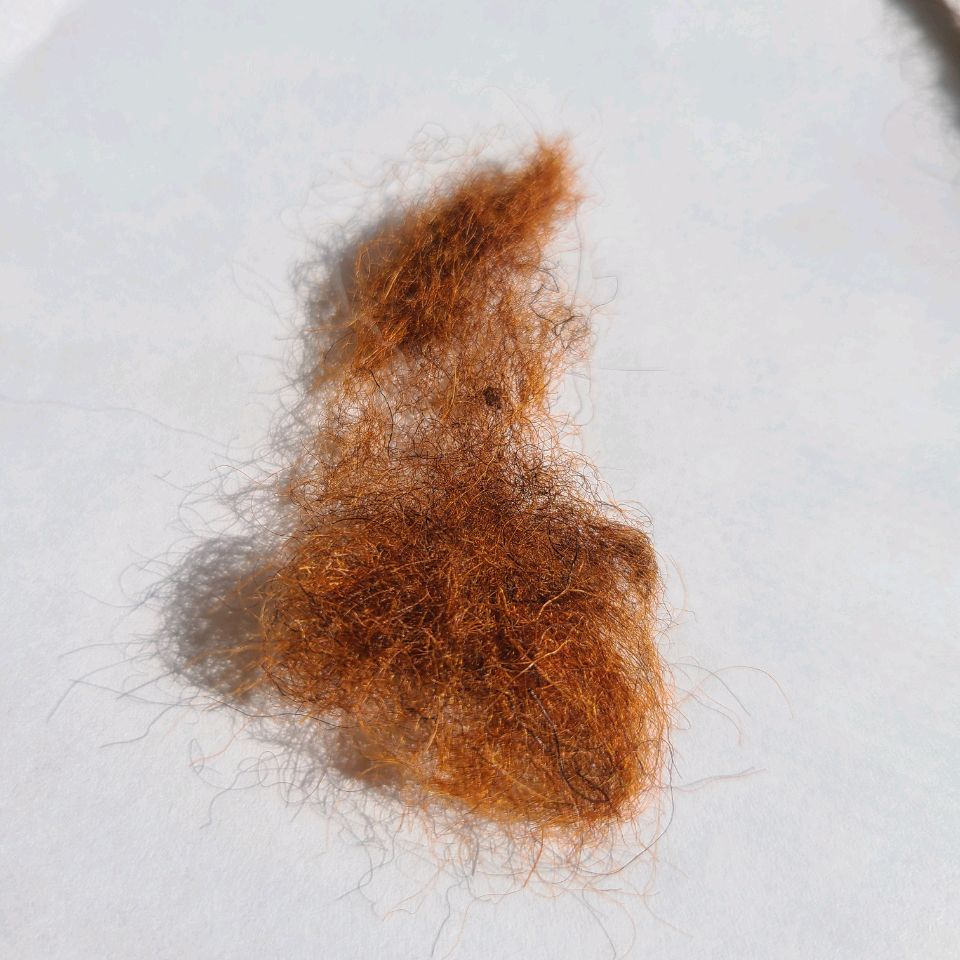
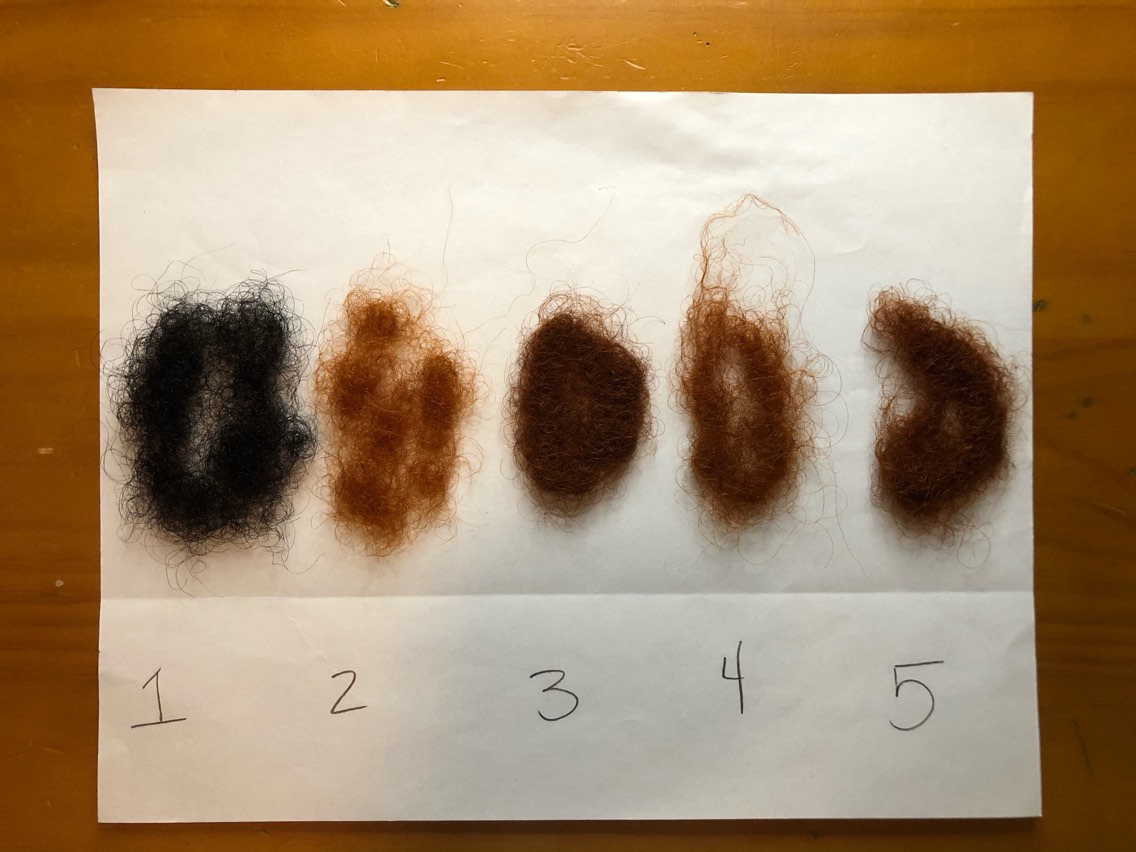
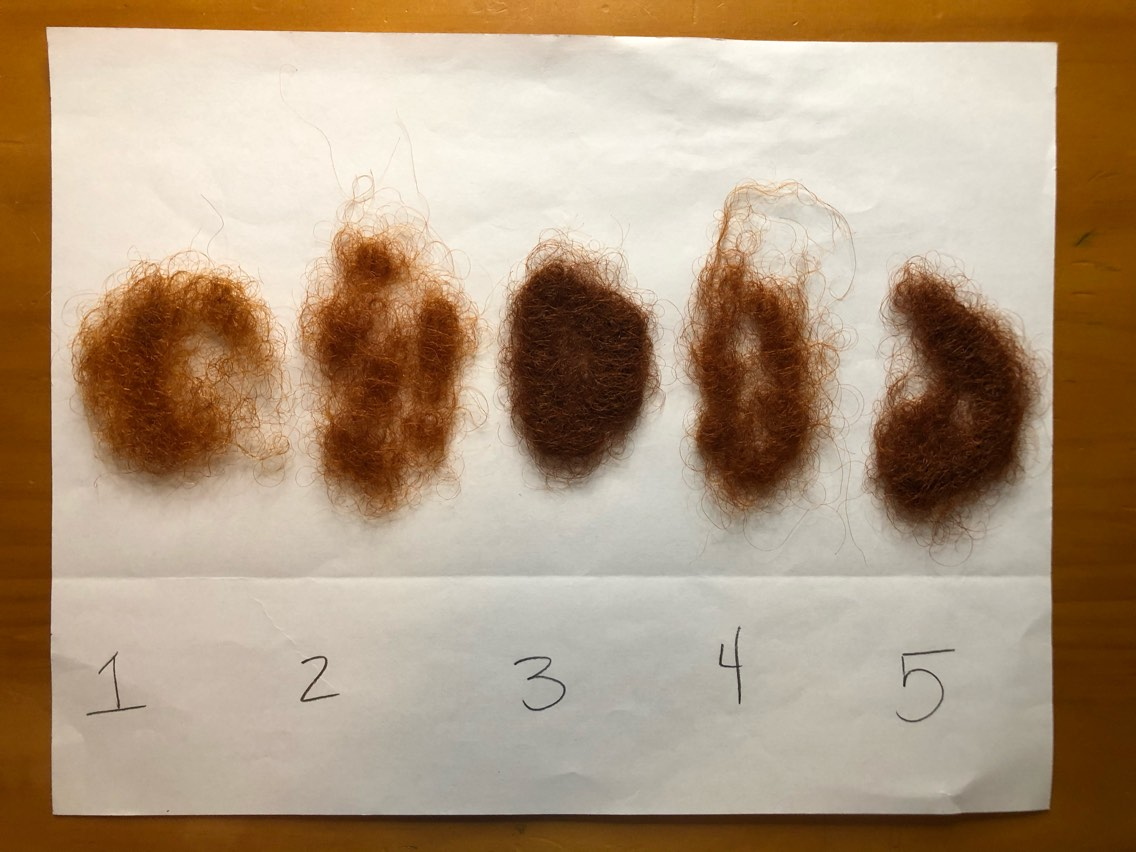
The samples have darkened after oxidation. Number 2 is ready to get lightened.

1 day after bleach (after henna application)
Number 2 is very light compared to the others. It appears brighter than the hair when it is lightened before henna.

2 weeks oxidized/1 week after henna
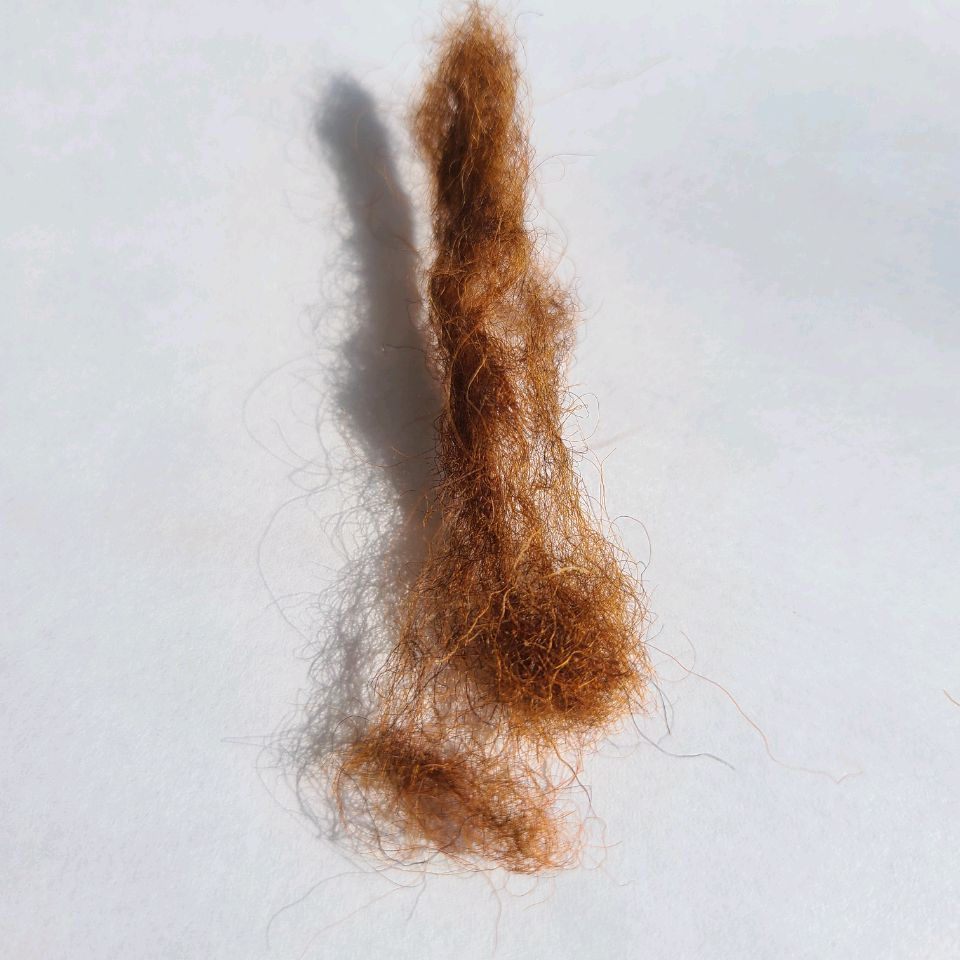
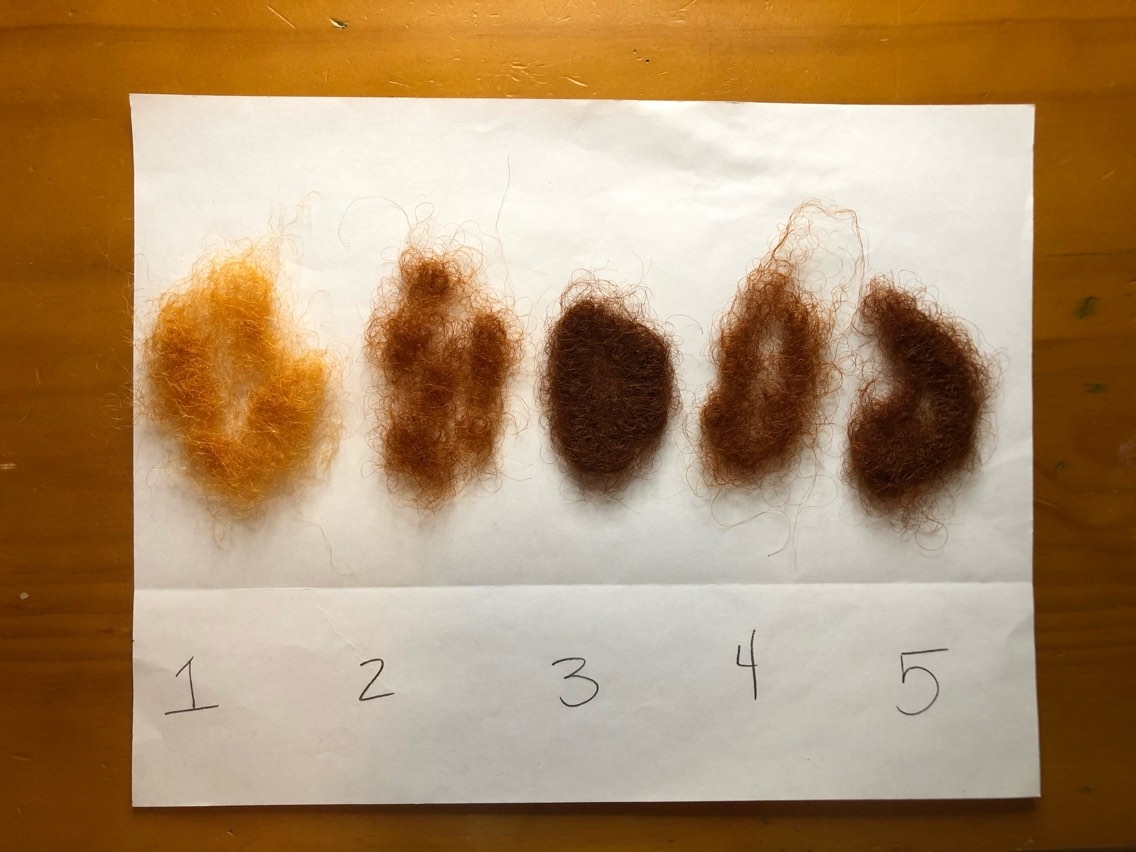
Number 4 is still lighter than number 3 and 5, as they stay very similar.

After application 2
Henna application has helped to darken all samples.

1 week oxidized after bleach
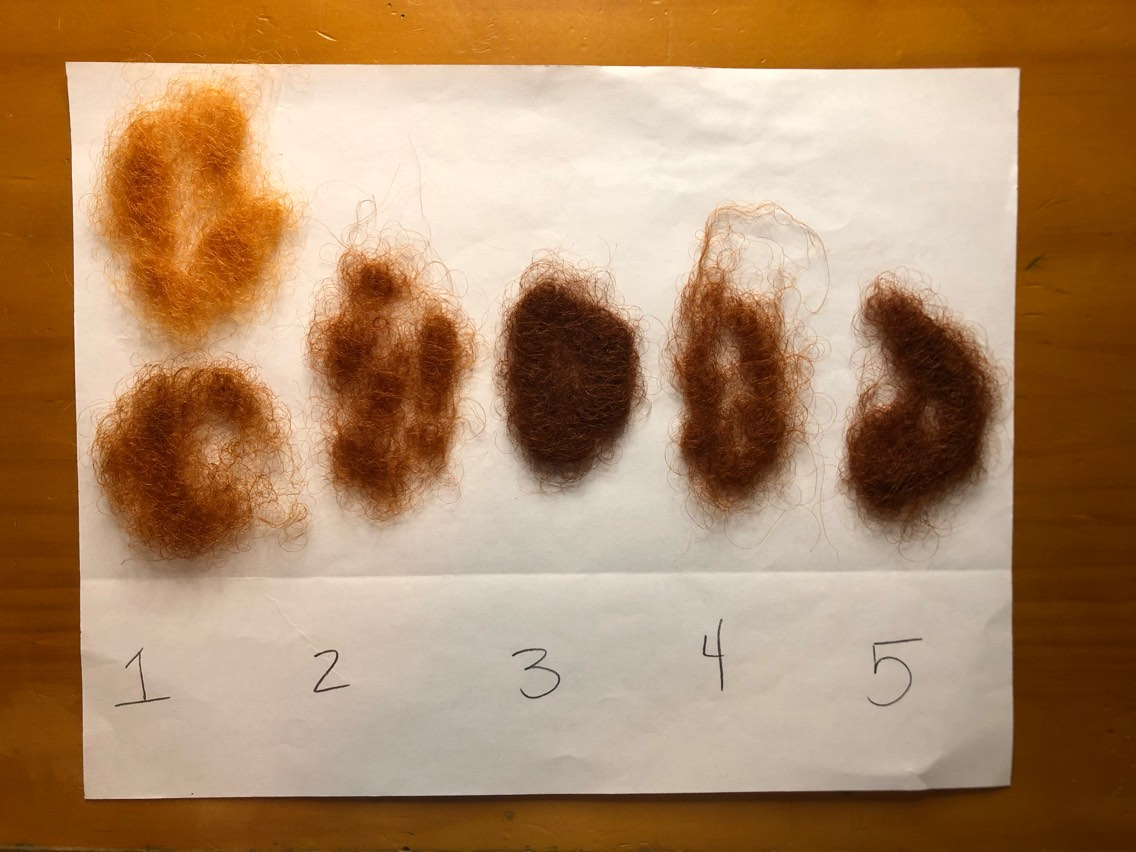
The samples are darker with oxidation and we prepare to lighten number 1

Right after damage
Slight fail as I let the sample sit too long

2 & 4
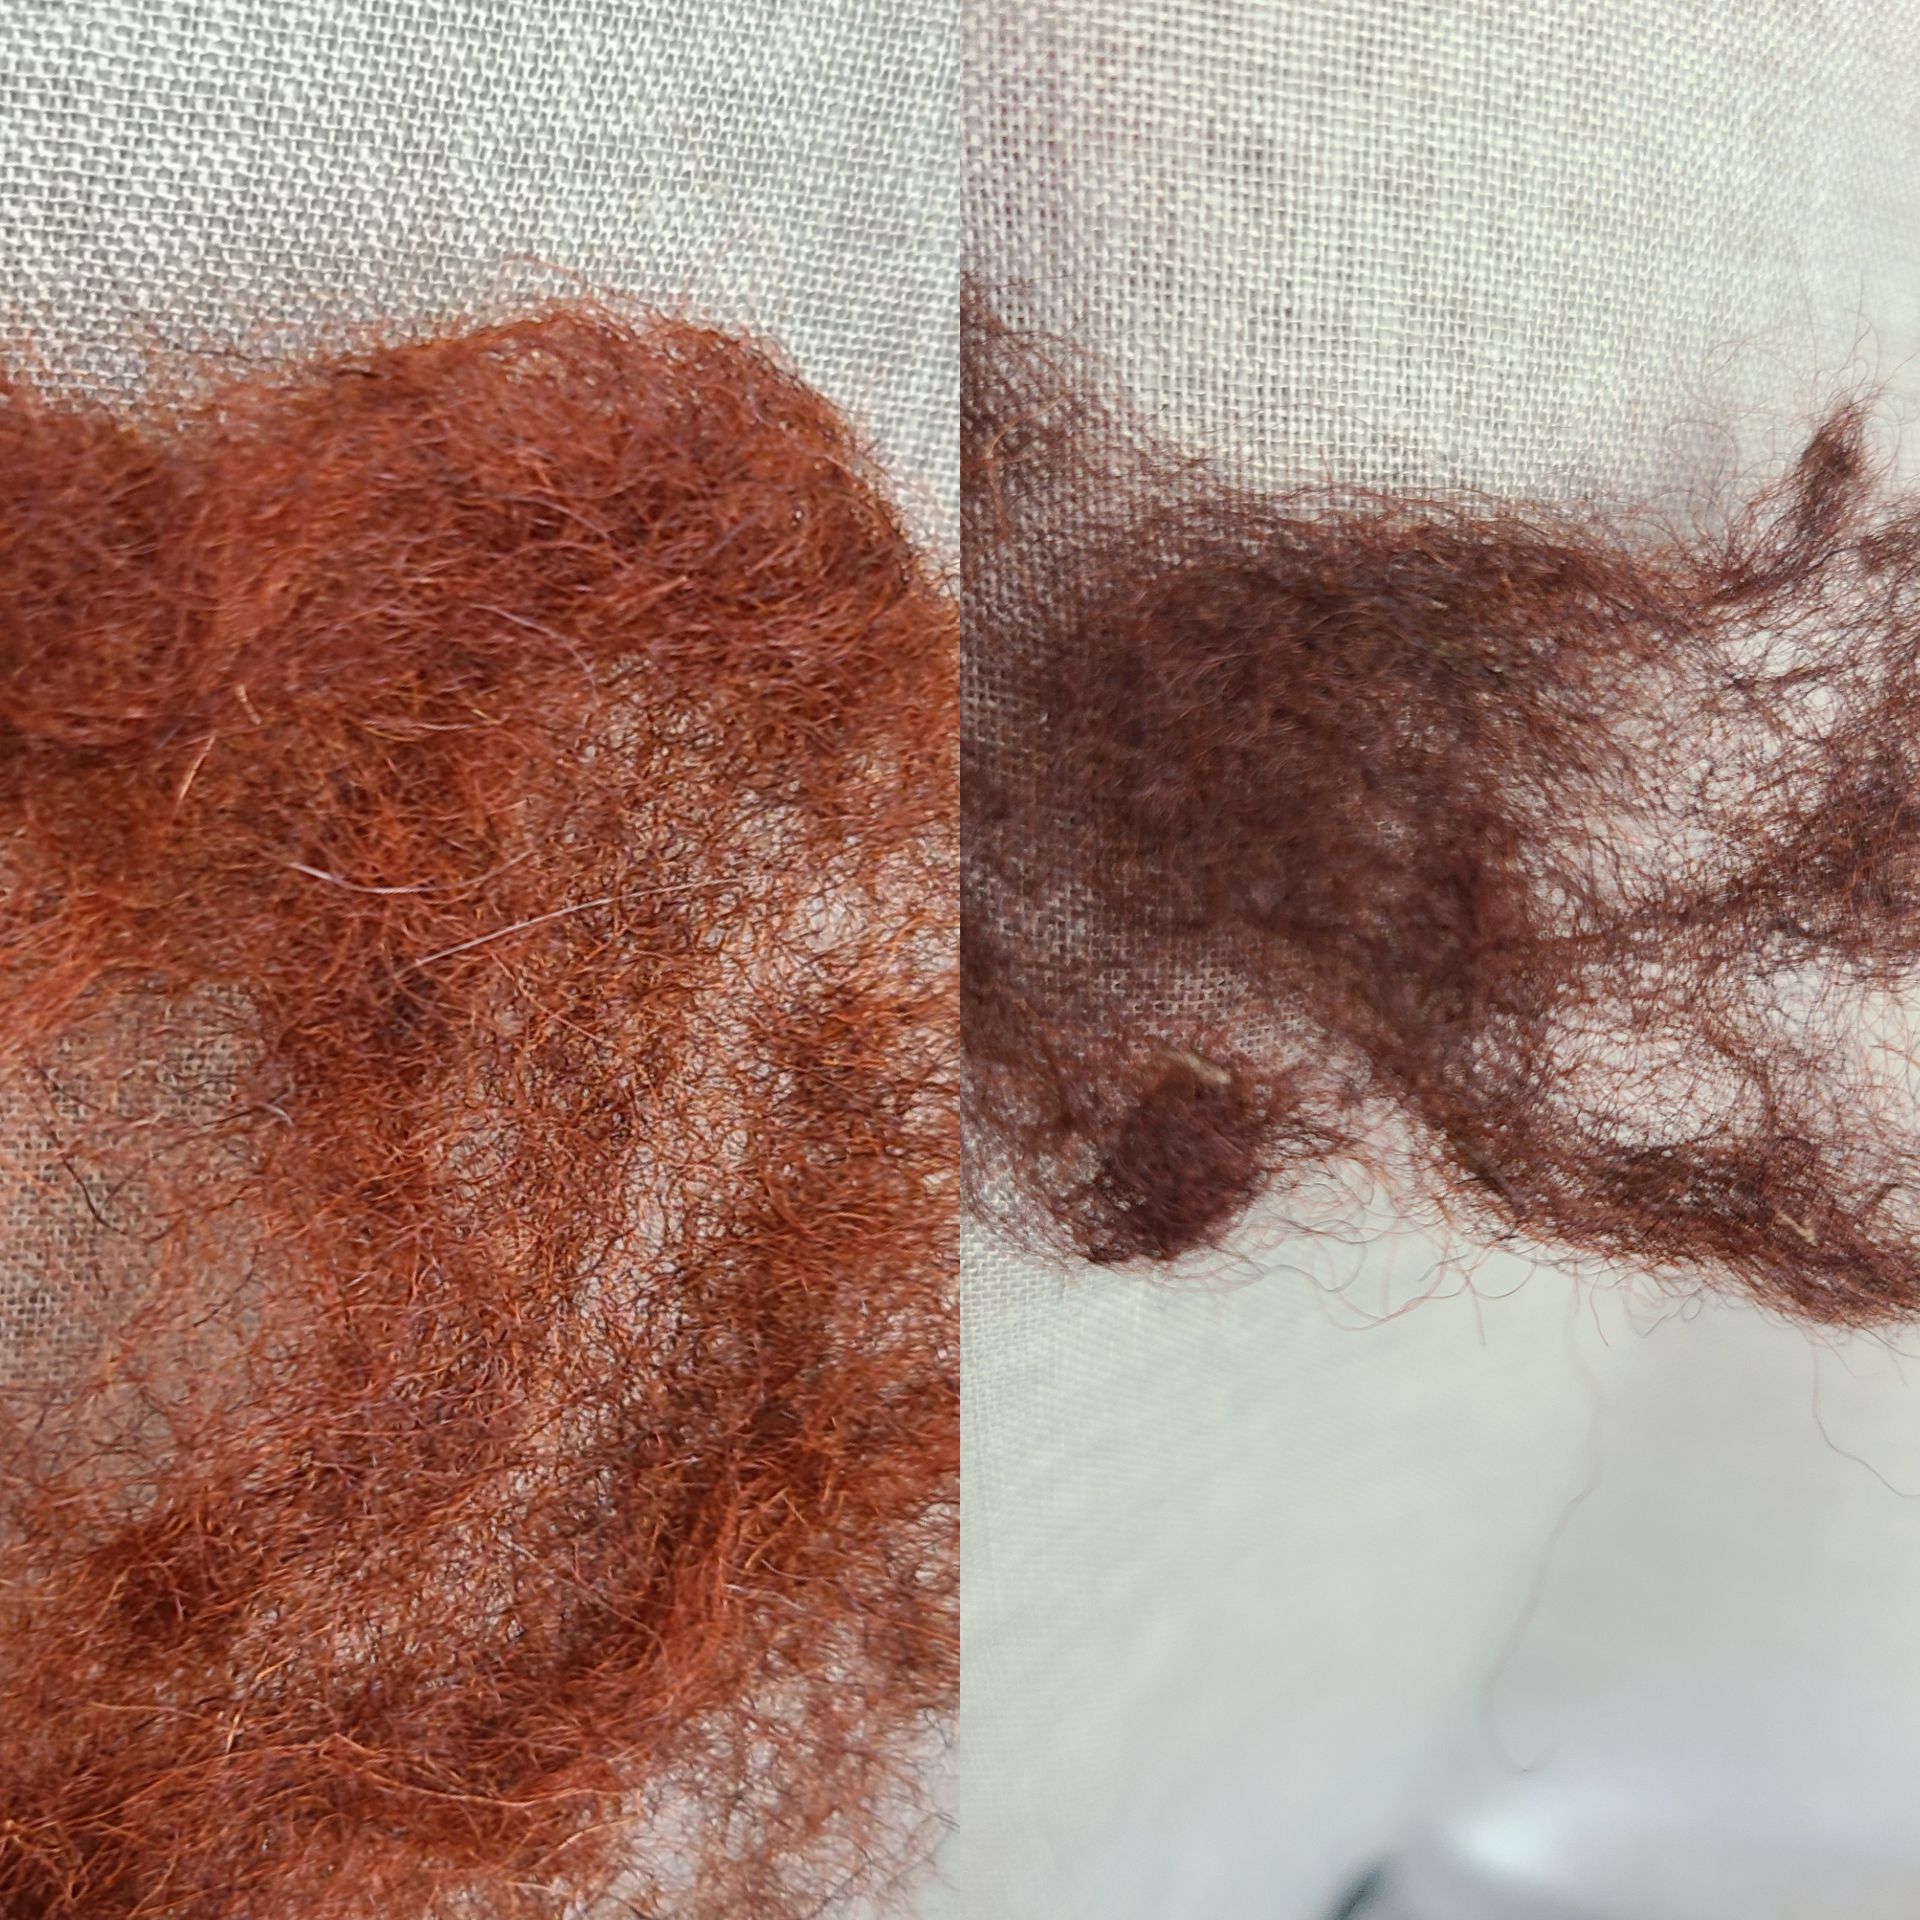
Number 2 and 4 are similar in color. Number 2 does appear to be lighter.

3 & 5
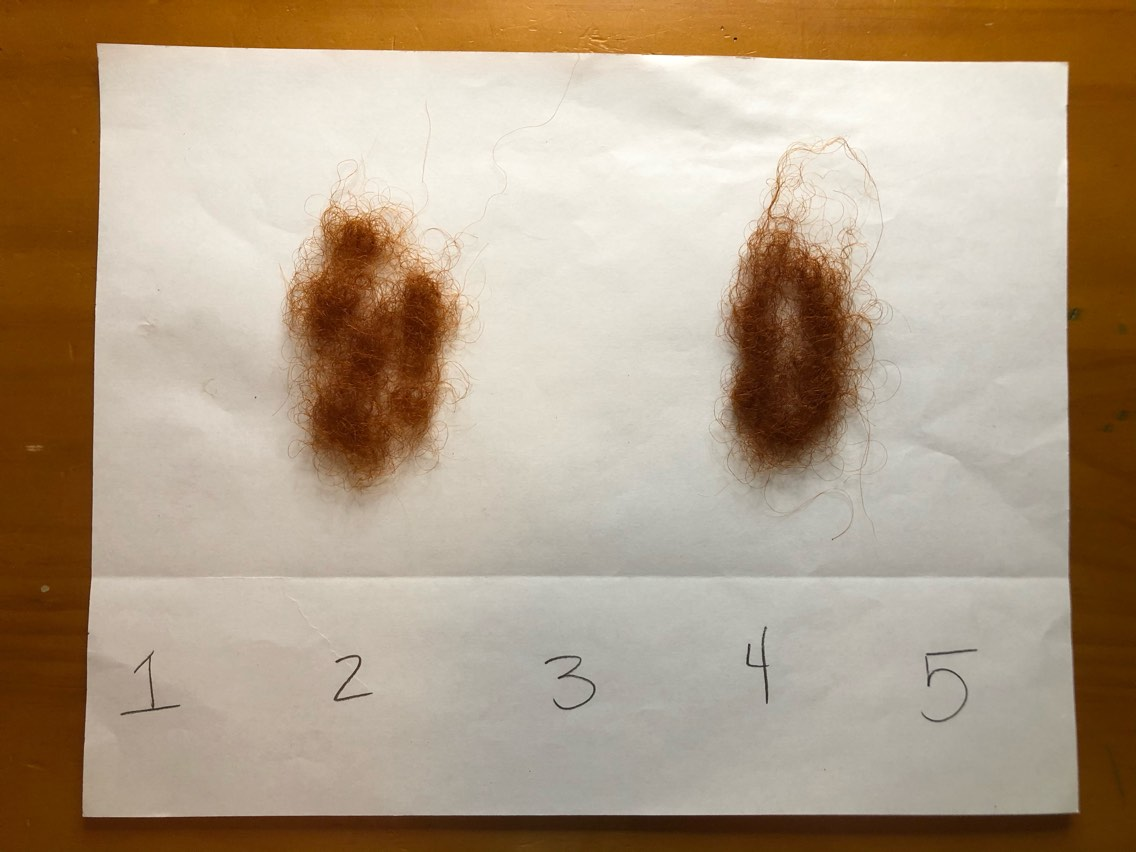
Number 3 and 5 are still very similar.

New 1
I recreated number 1 to get a more accurate result.

All samples
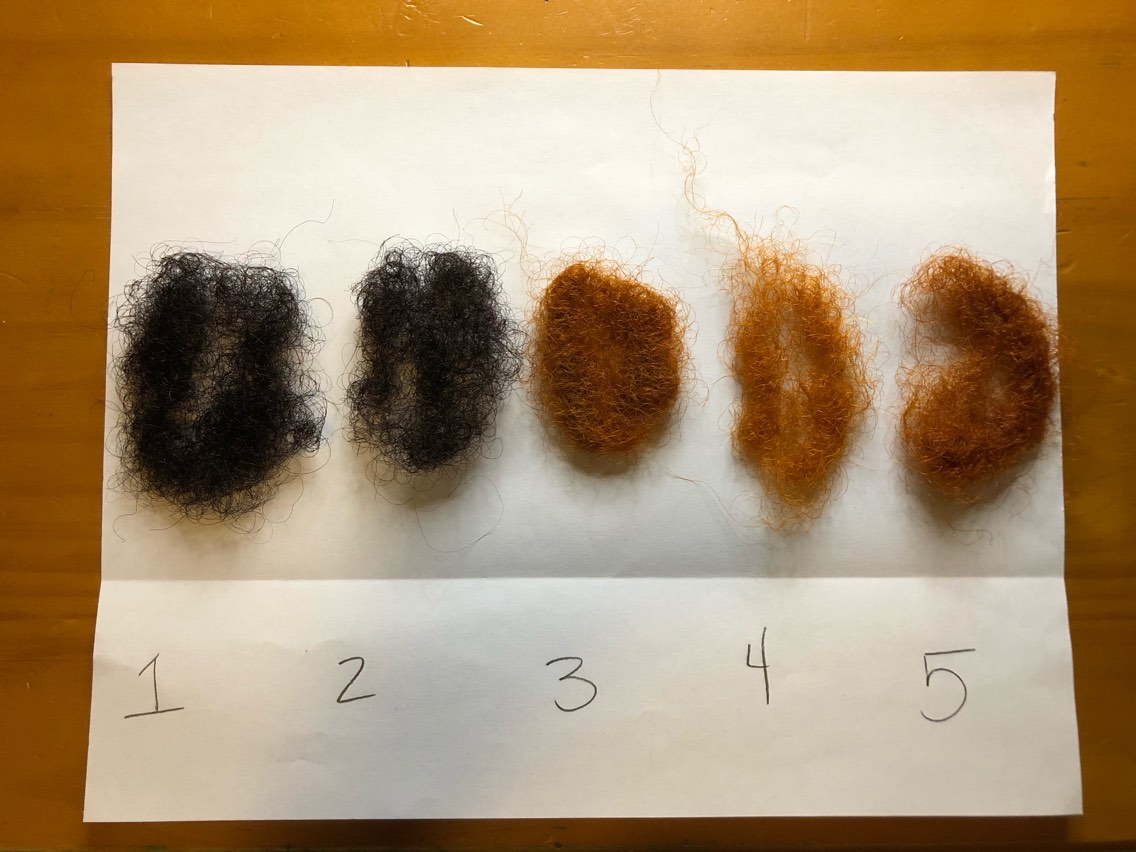
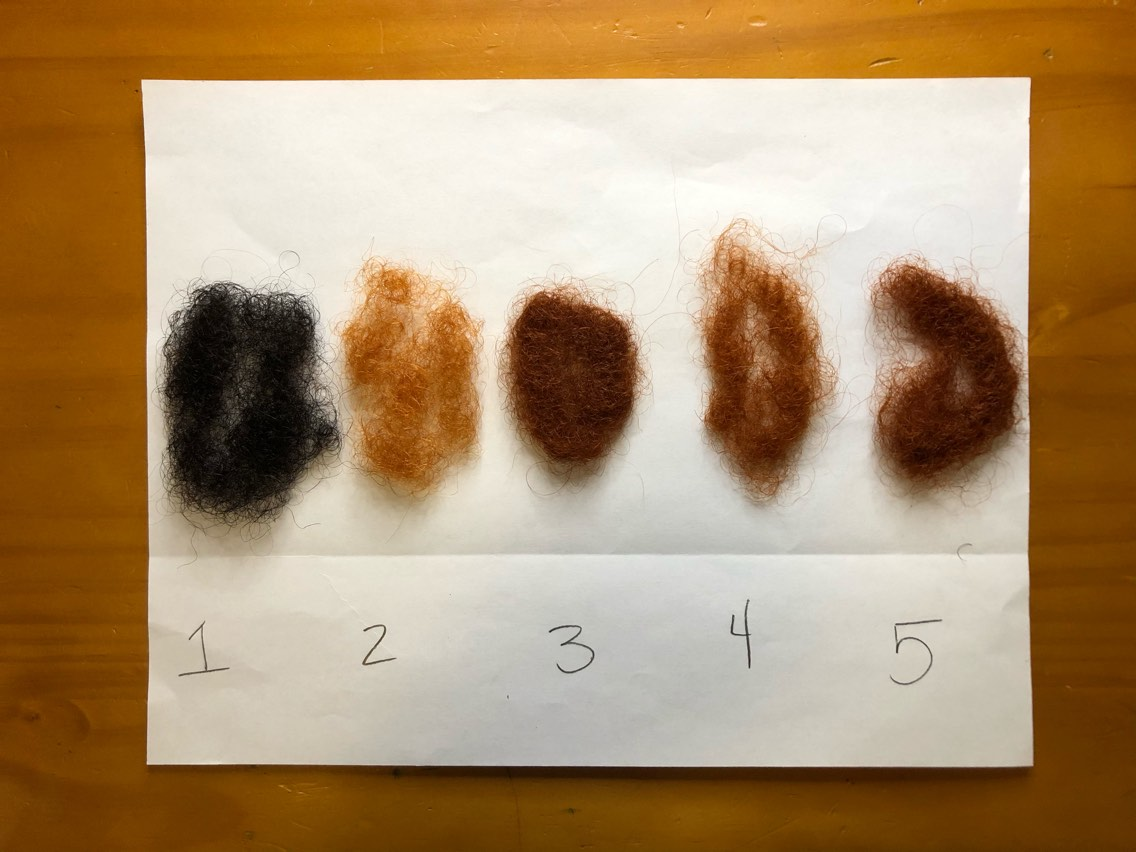
Here are all samples done to see the difference.

All natural light
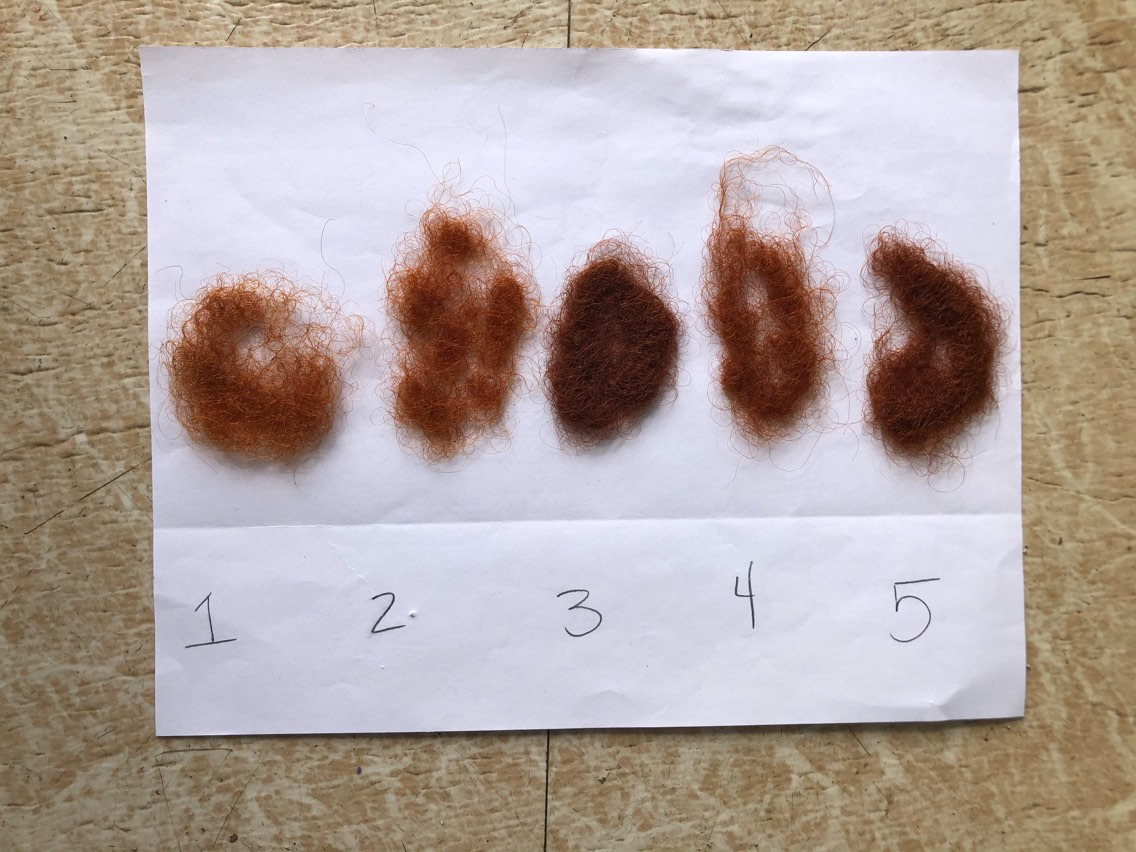
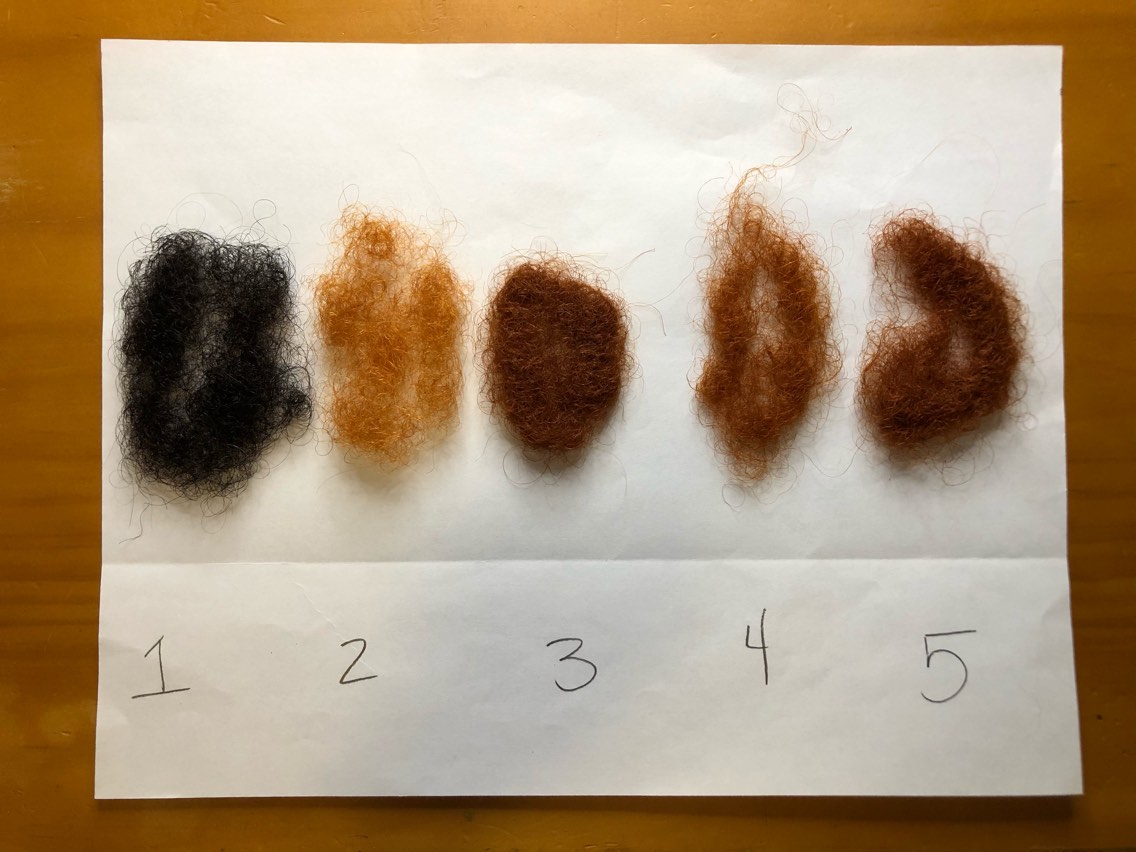
Here are the samples in natural light to see the difference from the concentrated indoor lighting.

In conclusion, the results were a little surprising to me. I knew that number 3 would come out darker because it was colored first. Numbers 1 and 2 are lighter than expected, as they both started with henna. Numbers 4 and 5 are exactly how I thought they would come out. Overall all of the samples are a lovely color.

To read about how henna can help damaged hair, check out this blog: https://www.ancientsunrise.blog/highlights-the-benefits-of-henna/

Damaris • Licensed Cosmetologist • Ancient Sunrise Specialist

Toning Henna – Part 2 (Stylists Editions)

In Toning Henna – Part 1 (Stylists Edition), five recipes were tested on hennaed hair, post oxidation, while one recipe was testing on hennaed hair prior to oxidation. I noticed that the hair was different between each recipe, but I didn’t expect to see such a difference between the hair that was toned before and after oxidation, even with similar recipes.

Welcome to Toning Henna – Part 2, where we explore the same mixes, same time frames but all of the hair had the toning mixes applied before the henna had time to oxidize.

Hair Prep

All of the mohair used was prepped by using a clarifying shampoo and the Twilight henna paste sat on the hair for 24 hours due to lack of body heat. Body heat allows us to keep the paste on for less time to get optimal results, so when testing on samples using henna, 24 hours is a good time frame).

Toning Mixes

All mixes are based on weight

A 90% cassia; 10% indigo (30 minutes ,60 minutes)
B 75% cassia; 25% indigo (30 minutes, 60 minutes)
C 50% cassia; 50% indigo (15 minutes, 30 minutes, 60 minutes)
D 25% cassia; 75% indigo (15 minutes, 30 minutes, 60 minutes)
E 10% cassia; 90% indigo (15 minutes, 30 minutes, 60 minutes)

Mixing Prep

Ancient Sunrise® Clarity Cassia and Sudina Indigo were used (Zekhara indigo can be used for toning as well). Both cassia and indigo powders were mixed together with distilled water right away. The paste should be a thick consistency, only slowly dripping off of the mixing utensil. The paste was applied right away after mixing.

Results

Original Control
Henna Control

Toning Henna (Part 2) • Comparing Mixes

First Test vs Second Test

After observing the samples over a weeks time, I noticed that these samples looked much different than the first series of tests I ran. It’s important to note that the only difference between the first and second tests was that the first test was done after the hennaed hair had settled into it’s final color, while the second test took place before the hennaed hair had settled into its final color.

Hair from the first test is on top in each photo; hair from the second test is on the bottom in each photo.

Every hair swatch of the second batch of samples appear to be lighter and cooler. Warmer tones show lighter to the human eye because of how we see color, therefore if they were the same level of hair color, all of the bottom swatches would be darker.

It’s probably safe to assume that if one were to do a mix that didn’t come out as warm as straight henna, that toning, either immediately or after a week of letting the hair sit, the results would be cooler in general. It will be important to conduct these tests over different swatches of hair and different mixes. For now, an accurate assessment would be that if you want your hair darker and not as red, then doing a toning mix with cassia and indigo would be good.

Final Notes

If you have a client who is panicking because their hair is brighter than what they’re comfortable with immediately after washing their paste out, keep in mind what results their looking for in the end. Always test any toning mix before applying all over as to prevent further complications. Sometimes just doing a toning shampoo can help calm the hair down during the oxidation if you don’t think that doing a toning mix is right for your client.

Always test to find out what mix and time will work best for you and your hair. Contact our customer service team for assistance: helpdesk@mehandi.com or call 1-855-MEHANDI or 330-673-0600. Visit http://www.Mehandi.com and HennaforHair.com for more information.

Maria • Ancient Sunrise® Specialist • Licensed Cosmetologist

Toning Henna Part 1 (Stylist Edition)

Whether the results were unexpected, your client changed their mind about their hair, or if the grays are extra resistant, toning henna is something that you should become familiar with. It is important to note that toning before henna fully oxidizes seems to give different results than toning after henna oxidizes, but this is something I’d like to study more of and elaborate in another blog. In this article, I’ll walk you through the steps in depth of toning henna from “just a tad” to a full blown gorgeous dark brunette. You can find more information on cassia here: http://www.hennaforhair.com/faq/Clarity_cassia-auriculata.pdf

Gray Hair (mohair) for testing
Twilight with Malluma Kristalovino

Mohair was prepped with salon grade clarifying shampoo and left to dry before applying a Twilight henna and Malluma Kristalovino mix. The henna paste was left on the hair for 24 hours – 4 of those hours were in front of a heater (with the heater rotating off and on). The temperature otherwise was 65-68 degrees Fahrenheit. The purpose of the heater was to simulate body heat.


A note about mohair

If you’re not sure why we use mohair for testing, it’s because it’s very similar to human hair. We don’t have a surplus of unprocessed gray human hair. Sure, there are virgin gray hair extensions and mannequins, but the cleaning process it has to go through does alter the hair and doesn’t give us realistic results which makes for poor testing.


Test 1

Mix: Cassia powder mixed with indigo powder (distilled water for the liquid). The cassia was not dye released and no fruit acid was used with cassia. The powder did not sit for any time before application.

Toning henna before oxidation vs toning henna after oxidation

Day 6: L-R 15 minutes, 30 minutes, and 60 minutes

80% Clarity Cassia to 20% Sudina Indigo Before Oxidation Application vs 75% Clarity Cassia to 25% Sudina Indigo After Oxidation Application.

A
15 Minutes

There wasn’t any visible change after 15 minutes of this particular mix before oxidation, so I chose to not do one after oxidation.

B
30 Minutes
B and D
30 minutes
Left side: B before oxidation application
Right side: D after oxidation application
C
60 minutes
C and E
60 minutes
Left side: C before oxidation application
Right side: E after oxidation application

Findings

Starting with A, as noted above, 15 minutes was not long enough to change anything visibly to the hair using an 80% cassia, 20% indigo mix. I chose not to do a mix after oxidation, because it just seemed that 15 minutes is insufficient for anything less than 50% cassia to 50% indigo.

Looking at images B and D you can see a little bit of change after 30 minutes, but not much. It’s important to note that the post oxidation mix (D) had 5% less indigo and 5% more cassia than pre-oxidation. I had theorized that B would have been darker than due to the change in the formulation that was applied to the oxidized hair D. They look almost identical, but in person D is just a little bit brighter.

Finally, let’s compare the strands that sat for an hour. Visibly, it’s clear that there was a color change. However, when you compare the samples in C and E you can see that the pre-oxidation application (C) is different than the post oxidized application (E). Again, I had expected the formula that was used on E would be darker, because it had more indigo and less cassia, but C actually looks slightly darker and appears more brown.

Test 2

Mix: Cassia powder mixed with indigo powder (distilled water for the liquid). The cassia was not dye released and no fruit acid was used with cassia. The powder did not sit for any time before application.

Toning Oxidized Hennaed Hair

Toning percentages based on powder weight:

10% indigo, 90% cassia: 30 minutes A, 1 hour B
25% indigo, 75% cassia: 30 minutes C, 1 hour D
50% indigo, 50% cassia: 15 minutes E, 30 minutes F, 1 hour G
75% indigo, 25% cassia: 15 minutes H, 30 minutes I, 1 hour J
90% indigo, 80% cassia: 15 minutes K, 30 minutes L, 1 hour M

Notes and Observations

The Results

The control hair vs mix M

It makes sense that as the ratio of indigo increases and cassia decreases, that the results get darker and less red. While some of the ratios are different, the results are similar at different timings. For example: there are similarities between J and L. J was 75% indigo and 25% cassia, but left on for one hour, where as L was 90% indigo and 10% cassia but left on for 30 minutes. This can be helpful, because if you have to tone thick and/or long hair, you may want to start out with using 75% indigo and 25% cassia, but then half way through switch to 90% indigo and 10% cassia so that way your results blend, and you don’t end up with one part of the hair being much darker than the rest.

There are also similarities between mix I and K. Mix I is 75% indigo and 25% cassia left on the hair for 30 minutes. Mix K is 90% indigo and 10% cassia left on the hair for 15 minutes.

Toning non-gray hair

It’s important to note that when you’re considering a mix for toning, you should observe the starting level and keep in mind how well the hair absorbs indigo. What may work for one client, may not work for another. The best way to determine the best ratio and timing for your client’s specific hair, is to do a small test. This will take time initially, but will save you time if the mix and timing you tested didn’t quite work out. (Can you imagine having to keep reapplying a mix because it didn’t come out the way you were expecting? Eek!).

Toning freshly hennaed hair

More research is needed to compare using these exact mixes on freshly hennaed hair. If you feel that you need to tone freshly hennaed hair, again, testing is recommended to be on the safe side. The most important information to take with you from this section is that hennaed hair, regardless if it’s only henna, henna/indigo, or henna/indigo/cassia need to oxidize for at least 5 days. You can expect another blog on this specific subject comparing the same mixes on freshly hennaed hair to get a better observation on this particular subject.

Lowlights

This technique doesn’t have to be used just for toning henna. One could do lowlights on hennaed hair by using different ratios of indigo and cassia. The mix could be created on the fly, and could be a nice service to add in when one wants more dimension.

In conclusion, it’s safe to say that cassia and indigo can be used for toning down bright hair. It seems that, unless the toning mix is more than 50% indigo, there really isn’t a point to leave the mix on for less than 30 minutes.

MariaAncient Sunrise SpecialistLicensed Cosmetologist